Using mods
This guide tells about using mods.
Setting up and using mods
After you have chosen and installed the mods you can enable them in the game, set them up and start playing.
Warning
Mods are created by the Project Zomboid community.
Mods created for an earlier version of the game may not work with newer versions. This is especially noticeable when using the test branch ("Unstable").
If you encounter errors in Project Zomboid when playing with mods enabled, please refer to the Mod problem solving article.
Using mods
- Start the game
- Click on the MODS button in the main menu
- Read and close warning menu
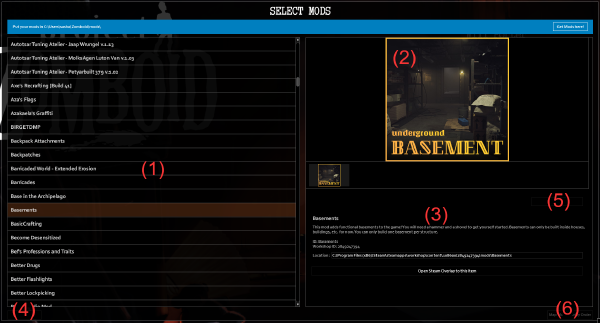
Ready! Before you menu with installed mods.
Menu items:
- List of mods
- Mod cover
- Description of the mod
- "Back" button (Return to the main menu)
- Button to turn on the mod
- Button for selecting the priority of loading maps
Enable/disable mods for the new game
- Open mod menu
- Select a mod from the list
- Click enable/disable (Or double click on mod in mod list)
- Click the "Back" button
Ready! Your chosen mods are now enabled. You can create a new world and play with mods.
Changing mods in an existing world
Before adding mods to an old save, it is highly recommended to make a backup save!
- Click the "Load" button
- Select the save
- Click the "More..." button in the lower right corner
- Press the button "Choose mods..."
- Enable / disable mods according to the instructions above
- Click the "Back" button
Ready! The list of mods has now been changed in your save.
Turning mods on and off for the host (server on your PC)
- Open server host settings
- Select the item "Steam Workshop" in the menu on the left (If you run the server without Steam, go to step 4)
- Select Steam Workshop mods from the drop down list and click on them to add them. To remove - select the mod in the list on the right and click the "Remove" button
- Next, select "Mods" from the menu on the left
- Select mods from the drop-down list and click on them to add (if you added mods in step 3 - then maybe some mods are already added). To remove - select the mod in the list on the right and click the "Remove" button
- (Optional - map mods) - Select "Map" in the menu on the left and set the order for loading the map. Maps are loaded from top to bottom and if the map intersect - map will overwrite intersected zones of the previous maps.
- Click save
Ready! Now you can start the host server.
Customize mods
Some mods have their own settings. They are usually added as a new tab in the game settings or in the sandbox menu. Read more on the pages of the mods you are using.
To configure mods for host servers, you must first enable the mods you want in the main menu and then configure the host server. In this case, you will have additional settings in the server world sandbox settings (or the mod settings will be waiting for you in the game settings).


