

Controls/fr
Le jeu étant encore uniquement prévu pour des claviers anglais (type QWERTY) il faut passer votre clavier français (en AZERTY) en configuration anglaise en appuyant à la fois sur alt et shift.
 Cet article concerne the general controls of Project Zomboid. Pour customising controls/key-bindings, voir Options.
 Screenshot of the in-game Key Bindings section of the Game Options - Version 39.57 |
The default controls are displayed below; most (not all) key bindings can be customised in the game options along with gamepad/controller configuration. In order to customise a key binding, the desired key change must be left-clicked, followed by the desired keystroke. If done correctly, the desired key will be displayed within the box.
Général
| Touche | Fonction | Description |
|---|---|---|
| RMB | Menu contextuel | Affiche le menu contextuel, qui contient toutes les interactions possibles avec ces objet. |
| LMB | Sélectionner | Dépend du contexte et varie en fonction de ce avec quoi on interagit, comme le ramassage d'objets, l'ouverture et la fermeture de portes, de fenêtres, de rideaux et d'interrupteurs. |
| = / MSW | Zoom avant | Rapproche la caméra du joueur, réduisant ainsi le champ de vision. |
| - / MSW | Zoom arrière | Éloigne la caméra du joueur, augmentant ainsi le champ de vision. |
| ESC | Menu principal |
|
Contrôle du caractère
| Touche | Fonction | Description |
|---|---|---|
| W | Avancer |
|
| S | Reculer | |
| A | Aller à gauche | |
| D | Aller à droite | |
| ⇧ Shift | Courir/Sprinter | Appuyez et maintenez (selon la configuration) pour augmenter la vitesse de déplacement, entraînant plus de bruit et moins d'endurance.. |
| E | Interagir |
|
| Q | Crier | |
| M | Ouvrir la carte | |
| ESC | Annuler l'action | Annule l'action actuellement effectuée par le joueur. |
Combat
| Touche | Fonction | Description |
|---|---|---|
| L. Ctrl / RMB | Mettre en joue/Se faufiler |
|
| LMB | Tirer/Attaquer | En appuyant sur cette touche, le joueur tire ou attaque dans la direction à laquelle il fait face. |
| Espace | Mélee | Permet au joueur d'effectuer une bousculade ou un piétinement de mêlée sans arme dans la direction à laquelle il fait face. |
| X | Insérer une balle | Introduit une cartouche dans une arme à feu en mode de rechargement intensif. " X " permet d'insérer une cartouche dans la chambre, rendant l'arme prête à tirer. |
| R | Recharger l'arme | |
| 1 | Équiper/Déséquiper une arme contondante |
|
| 2 | Équiper/Déséquiper une arme à feu | |
| 3 | Équiper/Déséquiper une arme tranchante | |
| F | Équiper/Allumer/Éteindre une lumière |
|
Inventaire
| Touche | Fonction | Description |
|---|---|---|
| I | Basculer vers l'inventaire | Permet de basculer entre l'affichage et le masquage de la fenêtre Inventaire. |
| RMB | Afficher le menu contextuel | Peut être utilisé sur n'importe quel objet dans l'inventaire du joueur ou d'un conteneur pour afficher son utilisation - s'il peut être mangé, bu, équipé ou utilisé dans une recette d'artisanat. |
| LMB | Sélectionner |
|
Mode Construction/Déplacement
| Key | Function | Description |
|---|---|---|
| R | Rotate building | Will rotate the selected item 90° each press when in build/move mode. |
| Tab ↹ | Toggle mode |
Cycles through furniture-moving modes.
|
| ESCAPE | Cancel Action | Exits the build/move mode |
Vehicle
General Vehicle Operation
| Key | Function | Description |
|---|---|---|
| W | Accelerate/Forward | |
| S | Brake/Reverse | |
| A | Turn left | |
| D | Turn right | |
| Spacebar | Hand brake |
Vehicle Radial Menu
| Key | Function | Description |
|---|---|---|
| V | Vehicle Radial Menu |
|
| F | Toggle Vehicle | Toggles the headlights between an on and off state. |
| N or W | Start Engine | Attempts to start the engine, either by key or hot-wiring. |
| O | Heater | Toggles the heater panel which can be used to adjust the vehicle's heating and cooling. |
| U | Info | Displays the vehicle mechanics/info, which can take a few seconds - the player must be outside the vehicle, otherwise they'll be removed from the vehicle before opening the panel. |
| E | Enter/Exit Vehicle | The vehicle can be entered when standing next to a door (displaying a green square) or through the radial menu. The player exits the vehicle from the side based on their current seat. |
| Z | Switch Seat | Displays the vehicle's seats, showing the player's and any occupied seats. The player can move seats by either clicking the desired seat, or by pressing the designated numbered hotkey shown on the seat. The player may also choose which seat to exit the vehicle from this menu. |
| Q | Horn | Sounds the vehicle's horn until the key is released, or if using the radial menu, it will sound for 2 seconds. Attracts any zombies towards the vehicle. |

- Device Options:
- Displays the panel of the installed radio.
- Open Window:
- Opens the player's seat window, making the inside temperature the same as the outside temperature. Will also allow zombies to attack the player.
- Sleep:
- Allows the player to sleep in the vehicle.
Vehicle Dashboard
Note: This section has been updated to version 40.43, and may not match the whole page's last updated version.
- Displays the current status of the vehicle. Some icons can be activated by clicking with the LMB.
- Numbers in red are status icons and those in green are accessories and other interactables.

Status Icons
Displayed in red
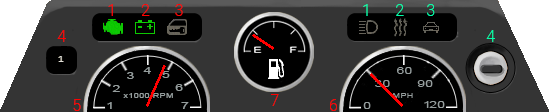
1. Engine Status
 : The engine is off(not ignited).
 : The engine is currently in the process of ignition.
 : The engine is on(ignited).
 : The engine is broken or not present in the car.
2. Battery
 : The car key is not inserted into the key slot, no info is given.
 : The battery is charged and functional.
 : The battery is discharged or not present in the car.
3. Door Lock
This icon does not need the car key to be inserted into the key slot to display the current state.
 : The car doors are unlocked and can be opened without car keys.
 : The car doors are locked and can only be opened using car keys.
4. Gearshift Position
- Displays the current gear the vehicle is in.
5. Tachometer
- Gauge that measures the rotation speed of the engine's crankshaft, displayed in RPM.
6. Speedometer
- Gauge that measures the vehicle's current speed, displayed in MPH.
7. Fuel Gauge
- Gauge that measures the current amount of fuel in the fuel tank, displayed in Litres (L).
Interactables
Displayed in green
1. Headlights
This icon does not need the car key to be inserted into the key slot to display the current state.
 : The headlights are off.
 : The headlights are on.
 : The headlights are broken, damaged or not present in the car.
2. Heater
This icon does not need the car key to be inserted into the key slot to display the current state.
 : The heater is off.
 : The heater is on.
3. Trunk Lock
This icon does not need the car key to be inserted into the key slot to display the current state.
 : The trunk is unlocked and can be opened without car keys.
 : The trunk is locked and can only be opened using car keys.
4. Key Slot
 : The car key is not inserted into the key slot, therefore the engine is not ignited and is off.
 : The car key is inserted into the key slot, but is not turned, therefore the engine is not ignited and is off.
 : The car key is inserted into the key slot and turned, therefore the engine is ignited and is on.
 The car key is not present, but the vehicle has been hot-wired. There is no way to tell if the engine is ignited or not by looking at the key slot in this state.


The key can be stored in the key slot with the engine off, draining the battery if any of the accessories are left on.
HUD
The head-up display or just HUD is the method of displaying information to the player as part of the user interface.
Time Controls
- File:TimeDisplay.jpg
- Pause: F2 or

- Pauses the game. Different to ESCAPE as it does not bring up the menu.
- Play: F3 or

- Changes the game speed back to the default speed. 10 minutes of in-game time corresponds to 25 seconds of real time.
- Fast-Forward x5: F4 or

- Increases game speed to 5x the default.
- Fast-Forward x20: F5 or

- Increases game speed to 20x the default.
- Fast-Forward x40: F6 or

- Increases game speed to 40x the default.
- Display time:
 or
or  or
or 
- Having either a classic wrist watch, digital watch or alarm clock in the player's main inventory will display the in-game time in the upper-right corner. The time format can be adjusted in the options menu.
Left-side HUD Icons
- File:Leftsidehud.jpg
- 1. Primary Item
- Displays the primary equipped item.
- 2. Secondary Item
- Displays the secondary equipped item.
- 3. Toggle Inventory UI: I
- Hides/shows the inventory when left-clicked.
- 4. Toggle Health Panel: H
- 5. Toggle Crafting UI: B
- Hides/shows the crafting panel, where the player's known recipes can be found.
- 6. Move Furniture
- Enables furniture-moving, which may require certain skills and tools depending on the furniture.
Information/Help
- Toggle Survival Guide: F1
- Hides/shows the survival guide, which is an brief in-game contextual tutorial describing certain aspects of Project Zomboid.
- Toggle UI: V
- Will hide/show the HUD, excluding moodles. Ideal for taking uncluttered screenshots.
- Note that this will not function when nearby a vehicle, and will instead trigger the vehicle radial menu.
- Display FPS: K
- Toggles the display of FPS (Frames Per Second) in the top-left corner of the screen.
- Toggle Lua Debugger: F11
- toggles the Lua debugger window, which can be used by modders. Requires the
-debuglaunch option.
- toggles the Lua debugger window, which can be used by modders. Requires the
Miscellaneous
- Shout: Q
- Causes the player to shout, drawing nearby zombies.
- Take screenshot: F10
- Pressing will take a screenshot and store it in the
\Users\USERNAME\Zomboid\Screenshotsfolder. - There is no in-game confirmation that a screenshot has been taken, therefore the player should be aware that each keystroke will save a new screenshot.
- Pressing will take a screenshot and store it in the
- Toggle Moveable Panel Mode: RBRACKET
- Locks/unlocks the ability to reposition panels, such as the inventory. [verify]
- Doesn't currently seem to function.
Multiplayer
- Toggle Safety: P
- Unknown
- Local Chat: T
- Unknown
- Global Chat: Y
- Unknown
- Push-to-Talk key: LALT
- Unknown
Controller
It is possible to use a gamepad rather than the standard mouse and keyboard, which is ideal for local 4 player split-screen co-op. To use a controller, it must first be connected and installed correctly in the operating system.
Any controller can be tested from the controller tab in the game options, to ensure all buttons are functioning correctly. The controller sensitivity can also be adjusted there.
 Controls of a standard XBox 360 controller |
The controls for a controller are usually context based and can change depending on the action, however they will usually be displayed on-screen. The general controls for a controller are displayed below.
- Left stick
- Player movement
- Left stick (press)
- Toggle between walking and running
- Directional Pad
- Navigate contextual menus
- Right stick
- Sneak/aim
- Navigate radial menu
 A button
- Primary button to interact with world objects, such as opening doors, windows and turning on/off lights.
- Context specific and will vary depending on what it interacts with
 B button
- Secondary button to interact with world objects, such as smashing windows and climbing over fences.
- Close/cancel contextual menus and panels (excluding inventory)
- Expand inventory item lists
 X button
- Display contextual menu, displaying available interactions
- Quick loot/drop item
 Y button
- Open/close inventory menu
- Left bumper
- Navigate tabs - rotates through player inventory tabs
- Cycle build mode
- Right bumper
- Navigate tabs - rotates through container inventory tabs
- Left trigger
- Shove/stomp (triggered on release)
- Right trigger
- Fire/attack (triggered on release)
- Back
- Press and hold to display radial menu
- Usage:
- Hold "Back" to display radial menu
- Move the "Left stick" to the desired option
- Release "Back" before the "Left stick" to select the option.
- Options:
- Player Info (Info, Skills, Health)
- Crafting
- Move Furniture
- Zoom In
- Zoom Out
- Pause/Play
- Fast-Forward Time
- Usage:
- Start
- Tap once to only pause the game, or tap twice to open pause menu