

Vehicles Guide/ru: Difference between revisions
No edit summary |
No edit summary |
||
| Line 17: | Line 17: | ||
На текущий момент существует 9 различных моделей транспортных средств, однако, существуют варианты служебных автомобилей, такие как [[Chevalier D6#Fossoil|Fossoil Chevalier D6]], аварийных служб, например, [[Chevalier Nyala#Police|Police Chevalier Nyala]]. Автомобили, относящиеся к определённым профессиям, содержат соответствующие предметы. Например, [[Franklin Valuline#Ambulance|Ambulance]] может содержать медикаменты. | На текущий момент существует 9 различных моделей транспортных средств, однако, существуют варианты служебных автомобилей, такие как [[Chevalier D6#Fossoil|Fossoil Chevalier D6]], аварийных служб, например, [[Chevalier Nyala#Police|Police Chevalier Nyala]]. Автомобили, относящиеся к определённым профессиям, содержат соответствующие предметы. Например, [[Franklin Valuline#Ambulance|Ambulance]] может содержать медикаменты. | ||
==Controls== | |||
Many of the [[Controls#Vehicle|vehicle controls]] can be customised in the [[Options|game options]]. The controls displayed below are the default key-bindings. | |||
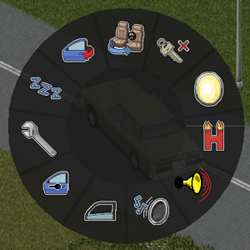
*Pressing <code>V</code> will bring up the vehicle's radial menu – from which will grant access to the ignition, car radio, headlights and more. | |||
::[[File:VehicleRadialMenu.png|link=Controls#Vehicle Radial Menu|Vehicle Radial Menu]] | |||
*Pressing <code>N</code> will start or shut off the engine. Pressing <code>W</code> inside the vehicle will also start the engine, if it is off. | |||
*Pressing <code>E</code> will enter or exit the vehicle, though be sure to get in on the driver’s side for a swift exit. | |||
*Pressing <code>F</code> will toggle the headlights. | |||
*Pressing <code>Q</code> will sound the horn. | |||
*Pressing <code>O</code> will bring up the heater controls. | |||
*Pressing <code>U</code> will bring up the Vehicle Mechanics menu. | |||
==Car Keys== | |||
[[Car Key|Car keys]] will only grant access to a specific vehicle. They are required to start the engine, unlock doors, unlock the trunk and use the accessories on the [[#Dashboard|dashboard]]. | |||
They can found: | |||
*On the ground in parking lots near the vehicle. | |||
*Inside storage [[Containers|containers]] in nearby houses. | |||
*Inside the vehicle in the ignition, glove box, etc. | |||
A key icon will appear over your character if they are in close proximity to the vehicle while possessing its key, indicating that it can be accessed and driven. | |||
[[File:VehicleKey.png|Player has the vehicle's key]] | |||
==Hot-wiring== | |||
If the car key can't be located, a vehicle can be hot-wired if the player has the required [[skills]] of: 1 electrical and 2 mechanics. Hot-wiring will change the ignition key slot icon on the dashboard and display the key icon above all players when they approach the vehicle. Therefore, a hotwired vehicle can be accessed by anyone, which may not be desired on a [[multiplayer]] game. | |||
Locked doors can be accessed by smashing the window or removing it from within the vehicle's mechanics menu. A failed attempt to hotwire will not damage the vehicle or screwdriver but may attract unwanted attention. | |||
==Tools== | |||
{| class="wikitable" style="text-align:center;" | |||
|- | |||
! Item !! Description !! Classname | |||
|- | |||
| [[File:Jack.png|link=Jack]] <br> [[Jack]] || Used to removed [[tire]]s, allowing access to [[brake]]s and [[suspension]]. || Base.Jack | |||
|- | |||
| [[File:LugWrench.png|link=Lug Wrench]] <br> [[Lug Wrench]] || Used to remove [[tire]]s, allowing access to [[brake]]s and [[suspension]]. || Base.LugWrench | |||
|- | |||
| [[File:TirePump.png|link=Tire Pump]] <br> [[Tire Pump]] || Used to inflate [[tire]]s || Base.TirePump | |||
|- | |||
| [[File:Spanner.png|link=Wrench]] <br> [[Wrench]] || Used to remove large parts: [[hood]]s, [[Trunk Lid|trunk lid]]s, [[Car Door|doors]]. || Base.Spanner | |||
|- | |||
| [[File:Smallscrewdriver.png|link=Screwdriver]] <br > [[Screwdriver]] || Used to remove small parts: [[Car Battery|batteries]], [[Car Window|window]]s, [[radio]]s. || Base.Screwdriver | |||
|- | |||
|} | |||
==Vehicle Mechanics Menu== | |||
The Vehicle Mechanics Menu displays information about various components of the vehicle. It displays the condition of all the parts within the vehicle, shown in a gradient from <span style="color:green">green</span> (100%) to <span style="color:red">red</span> (0%) – whereas a part that is missing will flash <span style="color:red">red</span>. This information can be accessed by pressing <code>E</code> at the front of the vehicle, using the vehicle radial menu or by right-clicking the vehicle opening the context menu. | |||
[[File:VehicleMechanics.png]] | |||
*The main display shows the durability/condition rather than the quality rating of the part. [[Car Battery|Batteries]] and [[Gas Tank|gas tanks]] have an additional quality, which is the power or gasoline remaining and is displayed in the upper right details section. | |||
*Certain parts are prone to wear and tear. [[Tire]]s, [[suspension]] and [[muffler]]s can be damaged with normal use. A random chance of damage will occur when the vehicle is moving more than 10MPH. Other factors considered are: current speed, whether the vehicle is on or off road, the vehicles off road efficiency, steering angle or pitch, how long the vehicle has been running. | |||
::''Taken from lua code in Vehicles.lua: <code>vehicle:getCurrentSpeedKmHour()</code>, <code>vehicle:isDoingOffroad()</code>, <code>vehicle:getScript():getOffroadEfficiency()</code>.'' | |||
*Engines have different horse power ratings, loudness and quality. | |||
*[[Muffler]]s have a noise multiplier. An old muffler will give a higher rating than a performance muffler. | |||
===Installing/Uninstalling Vehicle Parts=== | |||
To install or uninstall a vehicle part, the part must be in the player's inventory or an accessible [[container]]. Unlike other occupations, a specific [[mechanics]] skill is not required to install or uninstall parts, instead the player must learn the ''recipe'' by reading the [[Recipe Magazines|recipe magazine]] corresponding to the vehicle. A higher mechanic skill will increase the chances of installing/uninstalling the part without damaging it, the recommended skill is shown in the vehicle's info panel. Vehicle parts for a certain type will not be compatible with other vehicle types. For example, a heavy-duty wheel cannot be installed in a standard vehicle. | |||
While in the Vehicle Mechanics Menu, '''right-click''' the part that needs to be installed/uninstalled and select ''"Install"'' or ''"Uninstall"''. | |||
There are three major part subtypes in addition to the major vehicle type (Standard, Heavy-Duty, Sports). | |||
{| class="wikitable" style="text-align:center;" | |||
|- | |||
!Part | |||
!Subtypes | |||
!Vehicle Types | |||
|- | |||
|[[File:CarTire.png|link=Tire]]<br>[[Tire]] | |||
|Valu-Tire<br>Regular Tire<br>Performance Tire | |||
|Standard<br>Heavy-Duty<br>Sport | |||
|- | |||
|[[File:CarBrakes.png|link=Brake]]<br>[[Brake]] | |||
|Old Brake<br>Regular Brake<br>Performance Brake | |||
|Standard<br>Heavy-Duty<br>Sport | |||
|- | |||
|[[File:CarSuspension.png|link=Suspension]]<br>[[Suspension]] | |||
|Regular Suspension<br>Performance Suspension | |||
|Standard<br>Heavy-Duty<br>Sport | |||
|- | |||
|[[File:CarGastank.png|link=Gas Tank]]<br>[[Gas Tank]] | |||
|Small Gas Tank<br>Standard Gas Tank<br>Big Gas Tank | |||
|Standard<br>Heavy-Duty<br>Sport | |||
|- | |||
|[[File:CarTrunk.png|link=Trunk]]<br>[[Trunk]] | |||
|Small Trunk<br>Standard Trunk<br>Big Trunk | |||
|Standard<br>Heavy-Duty<br>Sport | |||
|- | |||
|[[File:CarWindshield.png|link=Car Window|Windshield]]<br>[[Car Window|Windshield]] | |||
|Windshield<br>Rear Windshield | |||
|Standard<br>Heavy-Duty<br>Sport | |||
|- | |||
|[[File:SideWindow.png|link=Car Window|Side Window]]<br>[[Car Window|Side Window]] | |||
|Front Window<br>Rear Window | |||
|Standard<br>Heavy-Duty<br>Sport | |||
|- | |||
|[[File:CarDoorFront.png|link=Car Door]][[File:CarDoorRear.png|link=Car Door]]<br>[[Car Door|Door]] | |||
|Front Door<br>Rear Door<br>Double Rear Door | |||
|Standard<br>Heavy-Duty<br>Sport | |||
|- | |||
|[[File:EngineDoor.png|link=Hood]]<br>[[Hood]] | |||
|Hood | |||
|Standard<br>Heavy-Duty<br>Sport | |||
|- | |||
|[[File:EngineDoor.png|link=Trunk Lid]]<br>[[Trunk Lid]] | |||
|Trunk Lid | |||
|Standard<br>Heavy-Duty<br>Sport | |||
|- | |||
|[[File:CarSeat.png|link=Seat]]<br>[[Seat]] | |||
|Standard Seat<br>Big Seat<br>Sports Seat | |||
|Standard<br>Heavy-Duty<br>Sport | |||
|- | |||
|[[File:CarMuffler.png|link=Muffler]]<br>[[Muffler]] | |||
|Old Muffler<br>Average Muffler<br>Performance Muffler | |||
|Standard<br>Heavy-Duty<br>Sport | |||
|- | |||
|} | |||
===Specialty Repairs=== | |||
*Engines require the player to have the car key, or to have hot-wired the vehicle, in order to repair or obtain [[Spare Engine Parts|spare engine parts]] [[File:SpareEngineParts.png|link=Spare Engine Parts]].. Removing parts will reduce the engine durability to 0 even if no parts are received. An engine can be repaired to 100% but may require additional spare engine parts. | |||
*Trunks cannot be swapped or fully repaired. They can be repaired with [[glue]], [[Duct Tape|duct tape]], [[Metal Sheet|metal sheet]] or [[Small Metal Sheet|small metal sheet]] (requires [[Metalworking Guide|metalworking]] skill). | |||
*Heaters are not repairable or swappable. | |||
*[[Radio]]s can be swapped with a standard household radio found in game. | |||
==Dashboard== | |||
[[File:VehicleDashboard.png]] | |||
#[[File:Enginetrouble_light.png]] Engine Light - turns engine on or off. | |||
#[[File:Battery_light.png]] Battery | |||
#Outside Temperature | |||
#[[File:Doorslocked_light.png]] Door locks - Locks or unlocks doors. | |||
#[[File:Headlights_light.png]] Headlights - Turns lights on or off. | |||
#[[File:Heating_light.png]] Heater/AC - Turns Heating or Air conditioner on or off. | |||
#[[File:Trunk_light.png]] Trunk Lock - Locks or unlocks trunk. | |||
#[[File:Ignition_light.png]] Ignition - Key storage slot. Key can be left in ignition engine off. | |||
The indicators on the dashboard have three primary colors. | |||
*<span style="color:#646560">'''Grey'''</span>: off | |||
*<span style="color:#13CD07">'''Green'''</span>: working/enabled/on. | |||
*<span style="color:#C06315">'''Orange'''</span>: starting. | |||
*<span style="color:#C00403">'''Red'''</span>: broken/disabled/off. | |||
==Refueling== | |||
A vehicle can be refueled by right-clicking on it and selecting "''refuel''", the option to "''siphon gas''" is available if the player has an [[Gas Can|empty gas can]]. Vehicles can be refueled using a [[Gas Can|gas can]] or at a gas pump, provided the gas pump is connected to a power source. If the option to refuel from the gas pump does not appear, the gas cap may be too far away from the pump; try repositioning the vehicle so that the gas cap is on the same side as the gas pump, most vehicles have gas caps on the driver's side. | |||
<div><ul> | |||
<li style="display: inline-block;"> [[File:PumpFossoil.png|thumb|80px|Fossoil gas pump]] </li> | |||
<li style="display: inline-block;"> [[File:PumpGas2Go.png|thumb|80px|Gas-2-Go gas pump]] </li> | |||
</ul></div> | |||
[[Category:Vehicles]] | |||
[[Category:Vehicles and Mechanics (Project)]] | |||
Revision as of 22:20, 26 September 2018
 Spiffo знает всё о вождении. |
Автомобили(Машины) являются средством передвижения в игре Project Zomboid и располагаются по всему Округу Нокс. Их можно найти вне помещений, на дорогах и парковках.
Типы транспортных средств
Автомобили существуют трёх типов, а также их детали, которые могут быть установлены только соответствующему данному типу транспортного средства. А чтобы отремонтировать машины (снимать/устанавливать детали), Игрок должен прочитать Журналы рецептов.
- Standard (Стандартные)
- Heavy-Duty (Тяжёлые)
- Sport (Спортивные)
На текущий момент существует 9 различных моделей транспортных средств, однако, существуют варианты служебных автомобилей, такие как Fossoil Chevalier D6, аварийных служб, например, Police Chevalier Nyala. Автомобили, относящиеся к определённым профессиям, содержат соответствующие предметы. Например, Ambulance может содержать медикаменты.
Controls
Many of the vehicle controls can be customised in the game options. The controls displayed below are the default key-bindings.
- Pressing
Vwill bring up the vehicle's radial menu – from which will grant access to the ignition, car radio, headlights and more.
- Pressing
Nwill start or shut off the engine. PressingWinside the vehicle will also start the engine, if it is off. - Pressing
Ewill enter or exit the vehicle, though be sure to get in on the driver’s side for a swift exit. - Pressing
Fwill toggle the headlights. - Pressing
Qwill sound the horn. - Pressing
Owill bring up the heater controls. - Pressing
Uwill bring up the Vehicle Mechanics menu.
Car Keys
Car keys will only grant access to a specific vehicle. They are required to start the engine, unlock doors, unlock the trunk and use the accessories on the dashboard.
They can found:
- On the ground in parking lots near the vehicle.
- Inside storage containers in nearby houses.
- Inside the vehicle in the ignition, glove box, etc.
A key icon will appear over your character if they are in close proximity to the vehicle while possessing its key, indicating that it can be accessed and driven.

Hot-wiring
If the car key can't be located, a vehicle can be hot-wired if the player has the required skills of: 1 electrical and 2 mechanics. Hot-wiring will change the ignition key slot icon on the dashboard and display the key icon above all players when they approach the vehicle. Therefore, a hotwired vehicle can be accessed by anyone, which may not be desired on a multiplayer game.
Locked doors can be accessed by smashing the window or removing it from within the vehicle's mechanics menu. A failed attempt to hotwire will not damage the vehicle or screwdriver but may attract unwanted attention.
Tools
| Item | Description | Classname |
|---|---|---|
Jack |
Used to removed tires, allowing access to brakes and suspension. | Base.Jack |
Lug Wrench |
Used to remove tires, allowing access to brakes and suspension. | Base.LugWrench |
Tire Pump |
Used to inflate tires | Base.TirePump |
Wrench |
Used to remove large parts: hoods, trunk lids, doors. | Base.Spanner |
Screwdriver |
Used to remove small parts: batteries, windows, radios. | Base.Screwdriver |
Vehicle Mechanics Menu
The Vehicle Mechanics Menu displays information about various components of the vehicle. It displays the condition of all the parts within the vehicle, shown in a gradient from green (100%) to red (0%) – whereas a part that is missing will flash red. This information can be accessed by pressing E at the front of the vehicle, using the vehicle radial menu or by right-clicking the vehicle opening the context menu.

- The main display shows the durability/condition rather than the quality rating of the part. Batteries and gas tanks have an additional quality, which is the power or gasoline remaining and is displayed in the upper right details section.
- Certain parts are prone to wear and tear. Tires, suspension and mufflers can be damaged with normal use. A random chance of damage will occur when the vehicle is moving more than 10MPH. Other factors considered are: current speed, whether the vehicle is on or off road, the vehicles off road efficiency, steering angle or pitch, how long the vehicle has been running.
- Taken from lua code in Vehicles.lua:
vehicle:getCurrentSpeedKmHour(),vehicle:isDoingOffroad(),vehicle:getScript():getOffroadEfficiency().
- Taken from lua code in Vehicles.lua:
- Engines have different horse power ratings, loudness and quality.
- Mufflers have a noise multiplier. An old muffler will give a higher rating than a performance muffler.
Installing/Uninstalling Vehicle Parts
To install or uninstall a vehicle part, the part must be in the player's inventory or an accessible container. Unlike other occupations, a specific mechanics skill is not required to install or uninstall parts, instead the player must learn the recipe by reading the recipe magazine corresponding to the vehicle. A higher mechanic skill will increase the chances of installing/uninstalling the part without damaging it, the recommended skill is shown in the vehicle's info panel. Vehicle parts for a certain type will not be compatible with other vehicle types. For example, a heavy-duty wheel cannot be installed in a standard vehicle.
While in the Vehicle Mechanics Menu, right-click the part that needs to be installed/uninstalled and select "Install" or "Uninstall".
There are three major part subtypes in addition to the major vehicle type (Standard, Heavy-Duty, Sports).
| Part | Subtypes | Vehicle Types |
|---|---|---|
Tire |
Valu-Tire Regular Tire Performance Tire |
Standard Heavy-Duty Sport |
Brake |
Old Brake Regular Brake Performance Brake |
Standard Heavy-Duty Sport |
Suspension |
Regular Suspension Performance Suspension |
Standard Heavy-Duty Sport |
Gas Tank |
Small Gas Tank Standard Gas Tank Big Gas Tank |
Standard Heavy-Duty Sport |
Trunk |
Small Trunk Standard Trunk Big Trunk |
Standard Heavy-Duty Sport |
Windshield |
Windshield Rear Windshield |
Standard Heavy-Duty Sport |
Side Window |
Front Window Rear Window |
Standard Heavy-Duty Sport |
Door |
Front Door Rear Door Double Rear Door |
Standard Heavy-Duty Sport |
Hood |
Hood | Standard Heavy-Duty Sport |
Trunk Lid |
Trunk Lid | Standard Heavy-Duty Sport |
Car Seat |
Standard Seat Big Seat Sports Seat |
Standard Heavy-Duty Sport |
Muffler |
Old Muffler Average Muffler Performance Muffler |
Standard Heavy-Duty Sport |
Specialty Repairs
- Engines require the player to have the car key, or to have hot-wired the vehicle, in order to repair or obtain spare engine parts File:SpareEngineParts.png.. Removing parts will reduce the engine durability to 0 even if no parts are received. An engine can be repaired to 100% but may require additional spare engine parts.
- Trunks cannot be swapped or fully repaired. They can be repaired with glue, duct tape, metal sheet or small metal sheet (requires metalworking skill).
- Heaters are not repairable or swappable.
- Radios can be swapped with a standard household radio found in game.
Dashboard

 Engine Light - turns engine on or off.
 Battery
- Outside Temperature
 Door locks - Locks or unlocks doors.
 Headlights - Turns lights on or off.
 Heater/AC - Turns Heating or Air conditioner on or off.
 Trunk Lock - Locks or unlocks trunk.
 Ignition - Key storage slot. Key can be left in ignition engine off.
The indicators on the dashboard have three primary colors.
- Grey: off
- Green: working/enabled/on.
- Orange: starting.
- Red: broken/disabled/off.
Refueling
A vehicle can be refueled by right-clicking on it and selecting "refuel", the option to "siphon gas" is available if the player has an empty gas can. Vehicles can be refueled using a gas can or at a gas pump, provided the gas pump is connected to a power source. If the option to refuel from the gas pump does not appear, the gas cap may be too far away from the pump; try repositioning the vehicle so that the gas cap is on the same side as the gas pump, most vehicles have gas caps on the driver's side.

