Debug mode: Difference between revisions
m (Insert empty line above each {{Navbox}}) |
|||
| (33 intermediate revisions by 8 users not shown) | |||
| Line 1: | Line 1: | ||
{{ | {{Header|Modding}} | ||
{{ | {{Page version|41.78.16}} | ||
{{ | {{Improve}} | ||
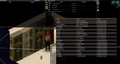
[[File:general-debuggers.png|thumb | [[File:general-debuggers.png|thumb|General debuggers option in debug mode.]] | ||
'''Debug mode''' is a modified game state in [[Project Zomboid]]. In this mode, the player has access to multiple developer tools which can spawn items, enable various cheats, teleport the player to any destination, and more. | '''Debug mode''' is a modified game state in [[Project Zomboid]]. In this mode, the player has access to multiple developer tools which can spawn items, enable various cheats, teleport the player to any destination, and more. | ||
==Enabling== | ==Enabling== | ||
[[File:Steam debug mode general launch options.png|300px|right|thumb|Entering <code>-debug</code> in the [[Steam]]'s launch options.]] | |||
To enable the debug mode, hold {{Key|LShift}} while the game is booting. (Windows only). | |||
For a more permanent option, add <code>-debug</code> to the game [[startup parameters]], prior to booting the game. | |||
{{Clear}} | |||
==Debug scenario== | ==Debug scenario== | ||
[[File: | [[File:Debug-scenario.png|thumb|200px|right|A list of debug scenarios at main menu.]] | ||
A list of debug scenarios can be found on the main menu, double-clicking will start the game in a predefined | A list of debug scenarios can be found on the main menu, double-clicking will start the game in a predefined scenario. | ||
Custom scenarios can be made by editing: | |||
"DebugScenario.lua" | |||
in the file folder: | |||
"ProjectZomboid\media\lua\client\DebugUIs\Scenarios" | |||
Or creating a new scenario. | |||
==Debug menu== | ==Debug menu== | ||
[[File: | [[File:Debug-menu.png|thumb|150px|right|The debug menu.]] | ||
The debug menu is a user interface allowing the player to view/manipulate the game state. | The debug menu is a user interface allowing the player to view/manipulate the game state. | ||
When in a game, a gray bug icon on the left of the HUD will appear when in debug mode. Clicking this, will make it red and display the debug menu. | |||
:[[File:Debug Icon Off.png]] ''Debug menu icon.'' | |||
:[[File:Debug Icon On.png]] ''Debug menu open icon.'' | |||
===Main=== | |||
====General debuggers==== | |||
=====Game===== | |||
===General debuggers=== | This option shows all general game options. | ||
====Game==== | {| class="wikitable theme-blue" style="width: 70%;" | ||
This option shows all general game options | |||
{| class=" | |||
|+ General Game Options | |+ General Game Options | ||
! Option | ! Option | ||
! style="width:60%" | Description | ! style="width: 60%;" | Description | ||
! Variables | ! Variables | ||
|- | |- | ||
| Line 35: | Line 43: | ||
| Adjust the game speed by moving the slider. Clicking the left and right arrows will increase/decrease the game speed by 0.1 increment at a time, or 1.0 if holding the sprint key ({{key|LShift}} by default). This value can range from 1 to 1000, with 0.1 increments. | | Adjust the game speed by moving the slider. Clicking the left and right arrows will increase/decrease the game speed by 0.1 increment at a time, or 1.0 if holding the sprint key ({{key|LShift}} by default). This value can range from 1 to 1000, with 0.1 increments. | ||
| default=1<br>fast-forward=5<br>fast-fast-forward=20<br>wait=40 | | default=1<br>fast-forward=5<br>fast-fast-forward=20<br>wait=40 | ||
|- | |||
| Get the choppah! | |||
| Spawns [[Metagame#Helicopter event|the helicopter event]]. | |||
| (button) | |||
|- | |||
| Remove the choppah! | |||
| Spawns [[Metagame#Helicopter event|the helicopter event]]. | |||
| (button) | |||
|- | |||
| Disable radio/tv broadcasting | |||
| Disables [[radio]] and [[television]] broadcasts. | |||
| boolean | |||
|- | |||
| Disable media line registering | |||
| | |||
| boolean | |||
|} | |} | ||
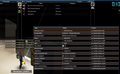
====Moodles and Body==== | =====Moodles and Body===== | ||
{| class=" | {| class="wikitable theme-blue" style="width: 70%;" | ||
|+ Player Stats and Body | |+ Player Stats and Body | ||
! Option | ! Option | ||
! style="width:60%" | Description | ! style="width: 60%;" | Description | ||
! Variables | ! Variables | ||
|- | |- | ||
| Line 91: | Line 115: | ||
| Slider that affects the [[stress]] moodle, decreases to 0 naturally. | | Slider that affects the [[stress]] moodle, decreases to 0 naturally. | ||
| min=0<br>max=1 | | min=0<br>max=1 | ||
|- | |||
| StressFromCigarettes | |||
| Slider that affects the [[stress]] moodle from [[cigarettes]]. | |||
| min=0<br>max=0.51 | |||
|- | |||
| TimeSinceLastSmoke | |||
| Slider that affects time since last [[Cigarettes|cigarette]] was smoked. | |||
| min=0<br>max=10 | |||
|- | |- | ||
| BoredomLevel | | BoredomLevel | ||
| Slider that affects the [[bored]] moodle, decreases to 0 naturally. | | Slider that affects the [[bored]] moodle, decreases to 0 naturally. | ||
| min=0<br>max=100 | |||
|- | |||
| UnhappynessLevel <sup>(sic!)</sup> | |||
| Slider that affects the unhapiness. | |||
| min=0<br>max=100 | | min=0<br>max=100 | ||
|- | |- | ||
| Line 135: | Line 171: | ||
| Slider that affects the player's sickness, naturally occurs after eating bad food. | | Slider that affects the player's sickness, naturally occurs after eating bad food. | ||
| min=0<br>max=100 | | min=0<br>max=100 | ||
|- | |||
| Calories | |||
| Slider that affects the player's [[Nutrition|calories]]. | |||
| min=-2200<br>max=3700 | |||
|- | |||
| Weight | |||
| Slider that affects the player's [[weight]]. | |||
| min=35<br>max=130 | |||
|- | |- | ||
| IsInfected | | IsInfected | ||
| Line 141: | Line 185: | ||
|- | |- | ||
| IsFakeInfected | | IsFakeInfected | ||
| Checkbox that determines whether the player | | Checkbox that determines whether the player should have zombie infection symptoms without being infected. | ||
| boolean | | boolean | ||
|- | |- | ||
| Line 153: | Line 197: | ||
|- | |- | ||
| God Mode | | God Mode | ||
| Checkbox that determines whether the player is in god mode. Gives the player invincibility, i.e. takes no damage, max hunger, thirst, etc. | | Checkbox that determines whether the player is in god mode. Gives the player invincibility, i.e., takes no damage, max hunger, thirst, etc. | ||
| boolean | | boolean | ||
|- | |- | ||
| Invisible | |||
| Checkbox that determines whether the player is in invisible. | |||
| boolean | |||
|} | |} | ||
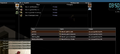
==== | =====Blood===== | ||
{| class=" | {{Stub}} | ||
=====SearchMode===== | |||
{{Stub}} | |||
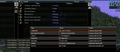
====Cheats==== | |||
{{Outdated}} | |||
{| class="wikitable theme-blue" style="width: 70%;" | |||
! Option | ! Option | ||
! style="width:60%" | Description | ! style="width: 60%;" | Description | ||
! Variables | ! Variables | ||
|- | |- | ||
| Line 181: | Line 235: | ||
|} | |} | ||
====Climate debuggers==== | |||
{{Outdated}} | |||
[[File:climate-control.png|thumb|200px|right|The climate control panel]] | |||
=== | =====FX panel===== | ||
This is opened by selecting "Other debuggers", then "WeatherFX Panel". Here you can play around with various values such as fog intensity, precipitation levels and precipitation type. Please note that to play around with these you will need to disable the ‘Climate’ manager or the simulated daily climate will overrule your changes. | This is opened by selecting "Other debuggers", then "WeatherFX Panel". Here you can play around with various values such as fog intensity, precipitation levels and precipitation type. Please note that to play around with these you will need to disable the ‘Climate’ manager or the simulated daily climate will overrule your changes. | ||
''Please also note that fog enabled through this method is for testing fog masking around buildings, and won’t look as good/varied as the fog generated by the virtual climate system – as it won’t take into account | ''Please also note that fog enabled through this method is for testing fog masking around buildings, and won’t look as good/varied as the fog generated by the virtual climate system – as it won’t take into account color or desaturation.'' | ||
====Climate view panels==== | =====Climate view panels===== | ||
The debug climate control and climate values panels can be accessed by selecting "Other debuggers", then "Weather plotter" and "Daily values" respectively. | The debug climate control and climate values panels can be accessed by selecting "Other debuggers", then "Weather plotter" and "Daily values" respectively. | ||
These panels provide a stockmarket-type graph of the current/recent weather over hours (H1), days (D1) and months (M1) | These panels provide a stockmarket-type graph of the current/recent weather over hours (H1), days (D1) and months (M1) | ||
| Line 197: | Line 252: | ||
These panels are overall for the provision of information, but that said when you toggle "airMass" on, when it crosses the 0 middle line you will see weather generated when airmass switches from hot/cold. | These panels are overall for the provision of information, but that said when you toggle "airMass" on, when it crosses the 0 middle line you will see weather generated when airmass switches from hot/cold. | ||
====Thunder panel==== | =====Thunder panel===== | ||
This panel can be opened by selecting "Other debuggers", then "Thunderbug", but is only useful if there is a storm active. A geographical indication of where the storm is over the PZ map can be seen, as well as lightning locations. | This panel can be opened by selecting "Other debuggers", then "Thunderbug", but is only useful if there is a storm active. A geographical indication of where the storm is over the PZ map can be seen, as well as lightning locations. | ||
====Player's Stats==== | |||
[[File:Player-stats.png|thumb|200px|right]] | |||
Access to player traits and skills interface. | |||
====Items List==== | |||
[[File:Items-list-viewer.png|thumb|200px|right]] | |||
Allows the spawning of any item in-game to the player's inventory. | |||
=== | ===Dev=== | ||
====isoRegions==== | |||
[[File:IsoRegionDebug.png|thumb|200px|right|The IsoRegions panel]] | [[File:IsoRegionDebug.png|thumb|200px|right|The IsoRegions panel]] | ||
This will display all buildings (including player-made) and can be used to detect when buildings are fully closed off from the PZ map – and as such will allow fog/precipitation to surround structures, but not appear within them. PLEASE NOTE: this is a real performance hog, so may well slow down the game when turned on. | This will display all buildings (including player-made) and can be used to detect when buildings are fully closed off from the PZ map – and as such will allow fog/precipitation to surround structures, but not appear within them. PLEASE NOTE: this is a real performance hog, so may well slow down the game when turned on. | ||
====Zombie Population==== | |||
[[File:Zombie-population.png|thumb|200px|right]] | |||
Shows all zombies as red dots on a map. | |||
====Stash debuggers==== | |||
[[File:stash-debug-ui.png|thumb|150px|right]] | |||
Allows the debugging of "annotated map" house stashes. | |||
=== | ====Anim monitor==== | ||
{{Stub}} | |||
====Zomboid Radio==== | |||
{{Stub}} | |||
====Animation Viewer==== | |||
{{Stub}} | |||
====Attachment Editor==== | |||
{{Stub}} | |||
====Chunk Debugger==== | |||
{{Stub}} | |||
====Global Objects==== | |||
{{Stub}} | |||
====Map Editor==== | |||
{{Stub}} | |||
====Vehicle Editor==== | |||
{{Stub}} | |||
====World Flares==== | |||
{{Stub}} | |||
====Statistic==== | |||
{{Stub}} | |||
====GlobalModData==== | |||
{{Stub}} | |||
==Contextual menus== | |||
There are new contextual menus availble in the debug mode available from right click menu. | |||
===Main=== | |||
{{Stub}} | |||
=== | ===UIs=== | ||
{{Stub}} | |||
===Objects=== | |||
Availble only when clicking some [[tiles]]. | |||
{{Stub}} | |||
=== | ===Zombies=== | ||
{{Stub}} | |||
===Brush Tool Manager=== | |||
{{Stub}} | |||
=== | ===Copy tile=== | ||
[[ | This option allows to copy and then paste a [[tile]] that is right clicked. There is a submenu to select tile, handy if multiple tiles are present in the spot. A tile ID is also shown. | ||
===Destroy tile=== | |||
This option allows to destroy a [[tile]] that is right clicked, similar to the [[sledgehammer]], except it works on any kind of tiles. There is a submenu to select tile, handy if multiple tiles are present in the spot. A tile ID is also shown. | |||
== | ===Item=== | ||
====Edit Item==== | |||
{{Stub}} | |||
====Destroy Item==== | |||
Allows to destroy item permanently, similar to trash cans. | |||
==Map options== | |||
{{Stub}} | |||
==Command console== | ==Command console== | ||
Also known as '''Lua Console''' in [[options]]. | |||
{{Stub}} | |||
==Lua Debugger== | |||
The '''Lua Debugger''' can be accessed by pressing {{Key|F11}} by default (which can be rebound in [[options]]); breaking into debugger at the next available [[Lua]] entry point. A list of all loaded Lua files are displayed on the right, with the currently selected file above the list. The line highlighted green is the entry point to the debugger, allowing for quick in-game debugging. | |||
===Map Debugger=== | |||
The map debugger is opened by clicking the "Map" button at the top. The player can teleport to the location of the cursor, by pressing {{Key|T}}. There is no prompt to inform the user of the teleport; after closing the debugger, the player will have teleported. | |||
===Options=== | |||
{{Stub}} | |||
Within the Lua Debugger menu there is an '''options''' menu with a long drop down, you can select from a variety of sources to help you find further information about your current session. Be careful with these options because some of them might cause your client to freeze and continuously crash upon launch. If this happens you can set the offending option to false in C:\Users\Username\Zomboid\debug-options.init. | |||
===DebugLog=== | |||
{{Stub}} | |||
===Errors=== | |||
{{Stub}} | |||
===Current Coroutine=== | |||
{{Stub}} | |||
===Lua file browser=== | |||
{{Stub}} | |||
== | ===Watch Window=== | ||
{{Stub}} | |||
===Lua Files=== | |||
You can use the in-game Lua file browser to search for the .lua file you're modifying and select it where it will be updated in the above window. If you make changes to the file, you can hit the "reload file" button and it will attempt to apply the changes you made in-game, though this is often an unreliable way to test recently updated code. | |||
==== | ==Trivia== | ||
;Glitches | |||
* [https://www.youtube.com/watch?v=x5pM1K6Tg1w I'm getting sick of these Zomboid cars | Project Zomboid Multiplayer] - Major glitch when driving. | |||
* [https://youtube.com/shorts/ORSNYa7Ol7U?si=eSPS1n3jA0GJmIwf We Found the MOST CURSED Dog Mod in Project Zomboid] - Dog opens doors by itself, but when it jumps over a fence, it is majorly and hilariously glitched. | |||
== | ==Gallery== | ||
<gallery> | |||
Chapel parking lot bug where car is on gate riverside church.png|[[Cemetery]] parking lot with a glitch. Ranger vehicle is on the fence | |||
Modding finding items mod mods military base 0.png|Finding items in debug mode [[Military Research Facility]] | |||
Modding finding items mod mods military base.png | |||
Modding finding items mod mods military base 3.png | |||
Modding finding items mod mods military base 4.png | |||
Modding finding items mod mods military base 5.png | |||
Modding finding items mod mods military base 6.png | |||
</gallery> | |||
==See also== | |||
{{ | {{Navbox modding}} | ||
Latest revision as of 14:52, 25 April 2024

Debug mode is a modified game state in Project Zomboid. In this mode, the player has access to multiple developer tools which can spawn items, enable various cheats, teleport the player to any destination, and more.
Enabling

To enable the debug mode, hold LShift while the game is booting. (Windows only).
For a more permanent option, add -debug to the game startup parameters, prior to booting the game.
Debug scenario

A list of debug scenarios can be found on the main menu, double-clicking will start the game in a predefined scenario.
Custom scenarios can be made by editing:
"DebugScenario.lua"
in the file folder:
"ProjectZomboid\media\lua\client\DebugUIs\Scenarios"
Or creating a new scenario.

The debug menu is a user interface allowing the player to view/manipulate the game state.
When in a game, a gray bug icon on the left of the HUD will appear when in debug mode. Clicking this, will make it red and display the debug menu.
 Debug menu icon.
 Debug menu open icon.
Main
General debuggers
Game
This option shows all general game options.
| Option | Description | Variables |
|---|---|---|
| GameSpeed | Adjust the game speed by moving the slider. Clicking the left and right arrows will increase/decrease the game speed by 0.1 increment at a time, or 1.0 if holding the sprint key (LShift by default). This value can range from 1 to 1000, with 0.1 increments. | default=1 fast-forward=5 fast-fast-forward=20 wait=40 |
| Get the choppah! | Spawns the helicopter event. | (button) |
| Remove the choppah! | Spawns the helicopter event. | (button) |
| Disable radio/tv broadcasting | Disables radio and television broadcasts. | boolean |
| Disable media line registering | boolean |
Moodles and Body
| Option | Description | Variables |
|---|---|---|
| Hunger | Slider that affects the hunger moodle, increases to 1 naturally. | min=0 max=1 |
| Thirst | Slider that affects the thirst moodle, increases to 1 naturally. | min=0 max=1 |
| Fatigue | Slider that affects the tired moodle, increases to 1 naturally. | min=0 max=1 |
| Endurance | Slider that affects the endurance moodle, increases to 1 naturally. | min=0 max=1 |
| Fitness | Slider that affects the fitness skill. This is a dynamic skill that will increase and decrease depending on the player's actions in 0.2 increments (per level). | min=-1 max=1 |
| Drunkenness | Slider that affects the drunk moodle, decreases to 0 naturally. A full bottle of alcohol adds 0.41. A higher value will increase the fatigue moodle at a much higher rate. | min=0 max=100 |
| Anger | Slider that affects the angry moodle, decreases to 0 naturally. | min=0 max=1 |
| Fear | Slider that affects an unknown naturally static value. | min=0 max=1 |
| Pain | Slider that affects the pain moodle, decreases to 0 naturally. Cannot be adjusted manually | min=0 max=100 |
| Panic | Slider that affects the panic moodle, decreases to 0 naturally. | min=0 max=100 |
| Morale | Slider that decreases to 0 naturally when stress is above 0.5. When stress is below 0.5, morale will instantly become 1.0. | min=0 max=1 |
| Stress | Slider that affects the stress moodle, decreases to 0 naturally. | min=0 max=1 |
| StressFromCigarettes | Slider that affects the stress moodle from cigarettes. | min=0 max=0.51 |
| TimeSinceLastSmoke | Slider that affects time since last cigarette was smoked. | min=0 max=10 |
| BoredomLevel | Slider that affects the bored moodle, decreases to 0 naturally. | min=0 max=100 |
| UnhappynessLevel (sic!) | Slider that affects the unhapiness. | min=0 max=100 |
| Sanity | Slider that can be adjusted when the BoredomLevel is above 50. | min=0 max=1 |
| Wetness | Slider that affects the wet moodle, decreases to 0 naturally. | min=0 max=100 |
| Temperature | Slider that affects the player's body temperature, affecting the hyperthermia and hypothermia moodles, decreases to 0 naturally. | min=20 max=40 |
| ColdDamageStage (hypo 4) | Slider that determines how much damage the player will take when the hypoermia moodle is at level 4. | min=0 max=1 |
| OverallBodyHealth | Slider that affects the player's overall health. | min=0 max=100 |
| CatchAColdStrength | Slider that affects the cold moodles, increaes to 100 naturally when above 1.0. | min=0 max=100 |
| Sickness | Slider that determines the sick moodle. Adjusts with InfectionLevel and FakeInfectionLevel Cannot be adjusted manually | min=0 max=1 |
| InfectionLevel | Slider that affects the player's progress towards zombification, increasing rate of damage taken. | min=0 max=100 |
| FakeInfectionLevel | Slider that affects the player's sickness, naturally occurs with the hypochondriac trait. | min=0 max=100 |
| FoodSicknessLevel | Slider that affects the player's sickness, naturally occurs after eating bad food. | min=0 max=100 |
| Calories | Slider that affects the player's calories. | min=-2200 max=3700 |
| Weight | Slider that affects the player's weight. | min=35 max=130 |
| IsInfected | Checkbox that determines whether the player has the zombie infection. | boolean |
| IsFakeInfected | Checkbox that determines whether the player should have zombie infection symptoms without being infected. | boolean |
| IsOnFire | Checkbox that determines whether the player is on fire. | boolean |
| Ghost | Checkbox that determines whether the zombies can see the player, and zombies can be seen regardless of visibility. | boolean |
| God Mode | Checkbox that determines whether the player is in god mode. Gives the player invincibility, i.e., takes no damage, max hunger, thirst, etc. | boolean |
| Invisible | Checkbox that determines whether the player is in invisible. | boolean |
Blood
SearchMode
Cheats
| Option | Description | Variables |
|---|---|---|
| Build Cheat | Checkbox that determines whether all buildables in the metalwork and carpentry menus can be instantly built without the need of a skill or tool. | boolean |
| Health Panel Cheat | Checkbox that determines whether the debug options inside the health panel are available. | boolean |
| Moveable Cheat | Checkbox that determines whether all moveables can be instantly moved/rotated without the need of a skill or tool. | boolean |
| Mechanics Cheat | Checkbox that determines whether the debug options inside the mechanics menu are available. | boolean |
Climate debuggers

FX panel
This is opened by selecting "Other debuggers", then "WeatherFX Panel". Here you can play around with various values such as fog intensity, precipitation levels and precipitation type. Please note that to play around with these you will need to disable the ‘Climate’ manager or the simulated daily climate will overrule your changes.
Please also note that fog enabled through this method is for testing fog masking around buildings, and won’t look as good/varied as the fog generated by the virtual climate system – as it won’t take into account color or desaturation.
Climate view panels
The debug climate control and climate values panels can be accessed by selecting "Other debuggers", then "Weather plotter" and "Daily values" respectively. These panels provide a stockmarket-type graph of the current/recent weather over hours (H1), days (D1) and months (M1)
To see what values are running under the bonnet use the legend/panel on the right, and values turned on will be green. The climate values panel, meanwhile, displays additional info about seasons, cloud cover, etc.
These panels are overall for the provision of information, but that said when you toggle "airMass" on, when it crosses the 0 middle line you will see weather generated when airmass switches from hot/cold.
Thunder panel
This panel can be opened by selecting "Other debuggers", then "Thunderbug", but is only useful if there is a storm active. A geographical indication of where the storm is over the PZ map can be seen, as well as lightning locations.
Player's Stats

Access to player traits and skills interface.
Items List

Allows the spawning of any item in-game to the player's inventory.
Dev
isoRegions

This will display all buildings (including player-made) and can be used to detect when buildings are fully closed off from the PZ map – and as such will allow fog/precipitation to surround structures, but not appear within them. PLEASE NOTE: this is a real performance hog, so may well slow down the game when turned on.
Zombie Population

Shows all zombies as red dots on a map.
Stash debuggers

Allows the debugging of "annotated map" house stashes.
Anim monitor
Zomboid Radio
Animation Viewer
Attachment Editor
Chunk Debugger
Global Objects
Map Editor
Vehicle Editor
World Flares
Statistic
GlobalModData
There are new contextual menus availble in the debug mode available from right click menu.
Main
UIs
Objects
Availble only when clicking some tiles.
Zombies
Brush Tool Manager
Copy tile
This option allows to copy and then paste a tile that is right clicked. There is a submenu to select tile, handy if multiple tiles are present in the spot. A tile ID is also shown.
Destroy tile
This option allows to destroy a tile that is right clicked, similar to the sledgehammer, except it works on any kind of tiles. There is a submenu to select tile, handy if multiple tiles are present in the spot. A tile ID is also shown.
Item
Edit Item
Destroy Item
Allows to destroy item permanently, similar to trash cans.
Map options
Command console
Also known as Lua Console in options.
Lua Debugger
The Lua Debugger can be accessed by pressing F11 by default (which can be rebound in options); breaking into debugger at the next available Lua entry point. A list of all loaded Lua files are displayed on the right, with the currently selected file above the list. The line highlighted green is the entry point to the debugger, allowing for quick in-game debugging.
Map Debugger
The map debugger is opened by clicking the "Map" button at the top. The player can teleport to the location of the cursor, by pressing T. There is no prompt to inform the user of the teleport; after closing the debugger, the player will have teleported.
Options
Within the Lua Debugger menu there is an options menu with a long drop down, you can select from a variety of sources to help you find further information about your current session. Be careful with these options because some of them might cause your client to freeze and continuously crash upon launch. If this happens you can set the offending option to false in C:\Users\Username\Zomboid\debug-options.init.
DebugLog
Errors
Current Coroutine
Lua file browser
Watch Window
Lua Files
You can use the in-game Lua file browser to search for the .lua file you're modifying and select it where it will be updated in the above window. If you make changes to the file, you can hit the "reload file" button and it will attempt to apply the changes you made in-game, though this is often an unreliable way to test recently updated code.
Trivia
- Glitches
- I'm getting sick of these Zomboid cars | Project Zomboid Multiplayer - Major glitch when driving.
- We Found the MOST CURSED Dog Mod in Project Zomboid - Dog opens doors by itself, but when it jumps over a fence, it is majorly and hilariously glitched.
Gallery
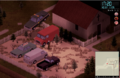
Cemetery parking lot with a glitch. Ranger vehicle is on the fence
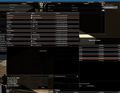
Finding items in debug mode Military Research Facility